[DevOps Series] Part 2: A Noob Guy Deploys His Web App
📚 Series Table of Contents
- 📖 Chapter 0: Introduction and Stories
- 📚 Chapter 1: Some concepts and terminologies
- 🚀 Chapter 2: A noob guy deploys his web app (You are here) 🎯
- 🐳 Chapter 3: Docker and the world of containerization 📦
- ☸️ Chapter 4: K8s in a nutshell ⚙️
- 🔧 Chapter 5: K8s in details 🛠️
- 🏠 Chapter 6: Before going to the ground 🏡
- 🐧 Chapter 7: Ubuntu server and the world of Linux 🖥️
- ⚡ Chapter 8: MicroK8s the simple and powerful K8s ⚙️
- ☁️ Chapter 9: Harvester HCI the native cloud 🌐
- 🏭 Chapter 10: More about Harvester HCI 🏢
- 🖥️ Chapter 11: Proxmox VE the best VM manager 💾
- 🌐 Chapter 12: Turn a server into a router with PfSense 🔌
- 🛠️ Chapter 13: Some tools, services that you can install for your DevOps pipeline 🔧
- 🌍 Chapter 14: Hello Internet with Cloudflare Zero Trust 🔒
- 🎉 Chapter 15: Maybe it’s the end of the series 🏁
With some AWS credits, here’s how I used to deploy my web app to production using AWS Lightsail.
1. Create a New AWS Lightsail Instance
- Login/register to AWS console. Get some credits: you can get 12 months of free credits or purchase some credits.
- Go to the AWS Lightsail console: https://lightsail.aws.amazon.com/
- Click on the “Create instance” button.
- I love Ubuntu and I recommend you choose Ubuntu too.
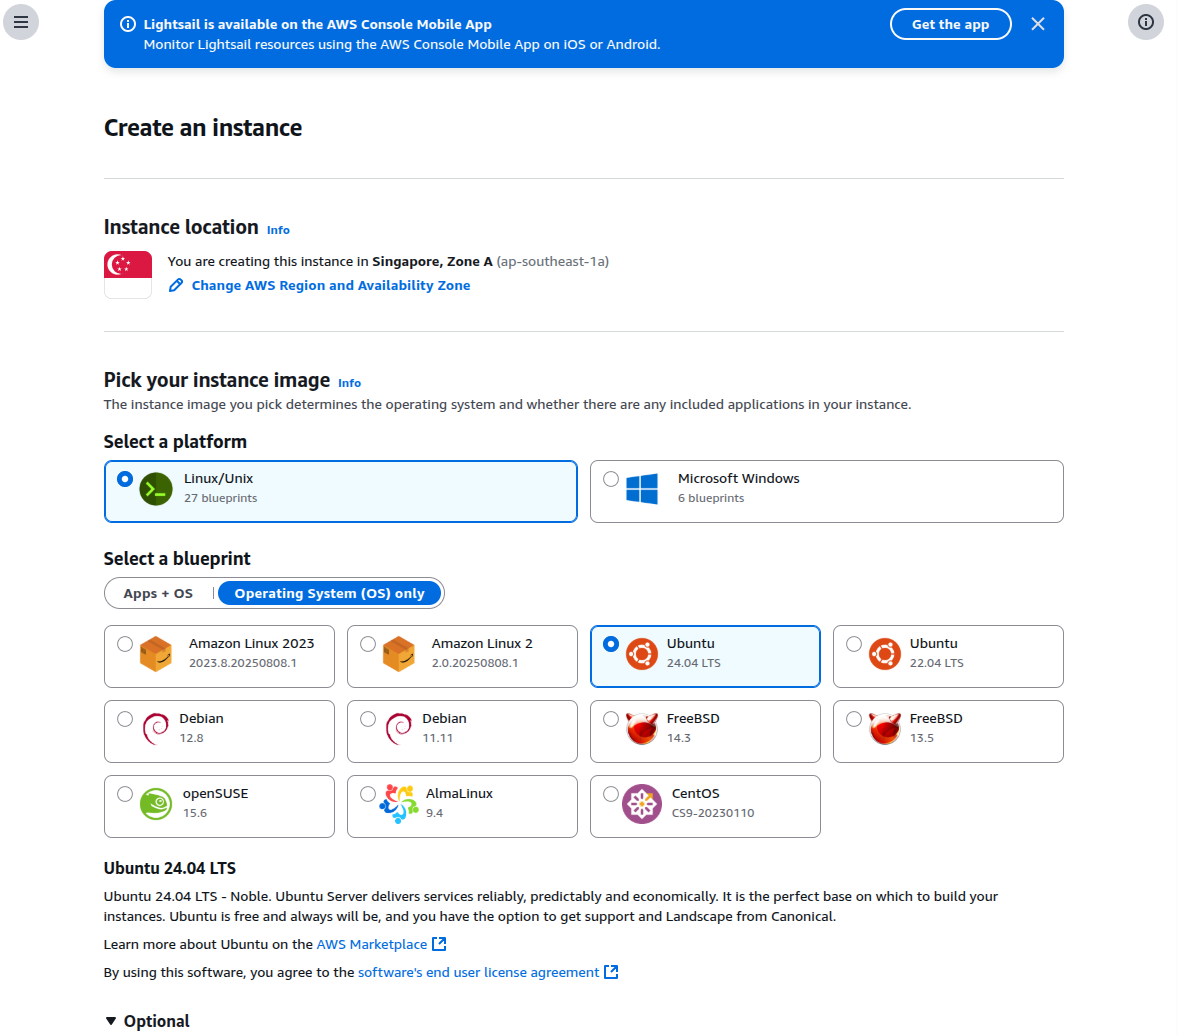
- In the SSH key section, just leave it as default or you can choose “Default SSH key”. We will configure SSH access to the instance later.
- Then choose your size. Lightsail will bundle the Size (RAM, CPU, Storage) for you. That’s why it’s easier than AWS EC2.
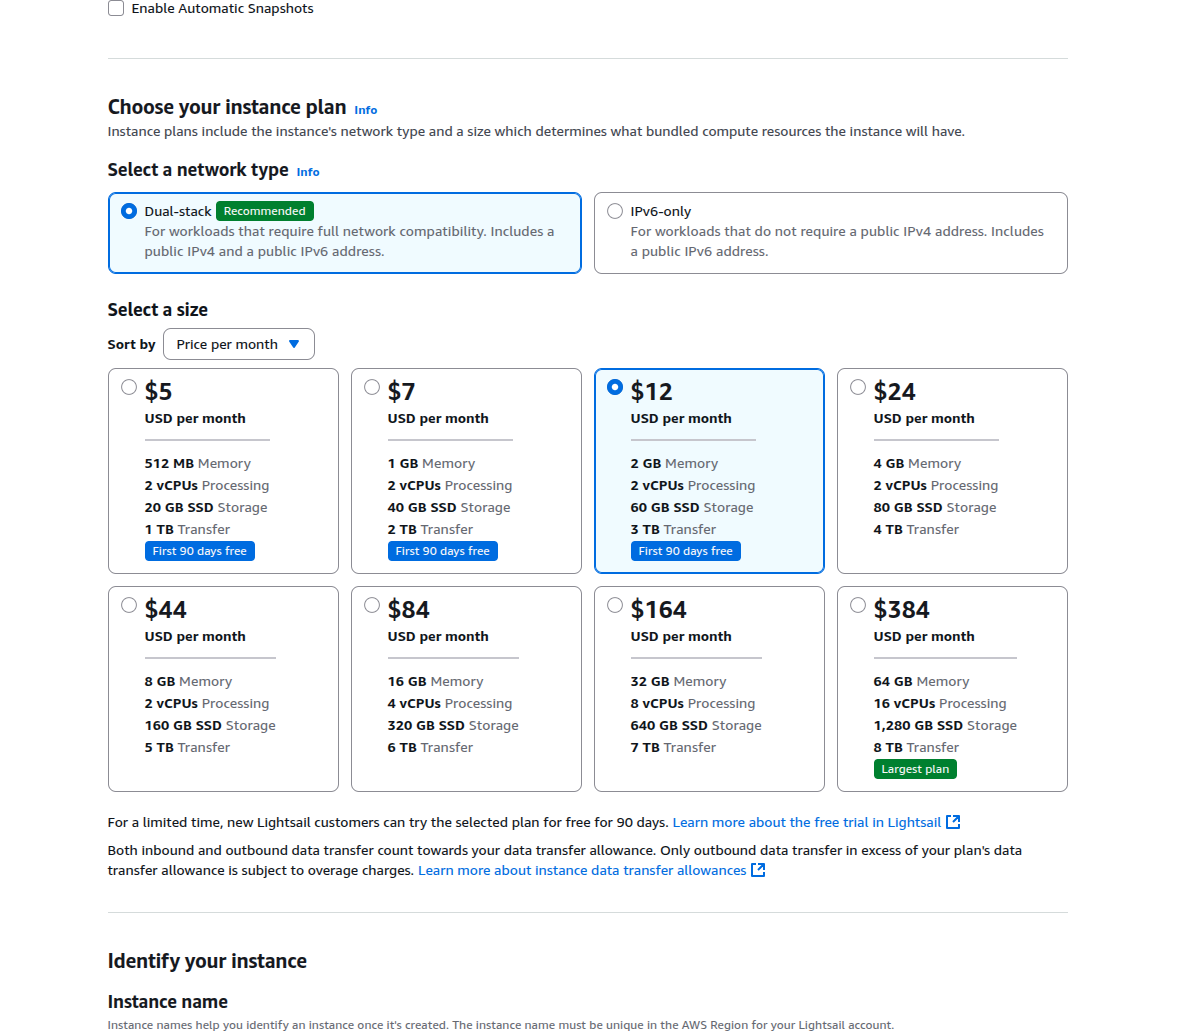
- Give your instance a name and click on the “Create instance” button.
2. Connect to the Instance via SSH
- SSH is a protocol that allows you to connect to a terminal/shell of a computer via the Internet.
- Shell or terminal is a CLI (Command Line Interface) - a tool that lets you interact with the computer using text commands instead of GUI (Graphical User Interface). In servers, we don’t need GUI; we need terminal to manage our server. It makes you more flexible and powerful than GUI.
- When your VM is ready, you can click the terminal button to connect to the instance via the web SSH protocol.
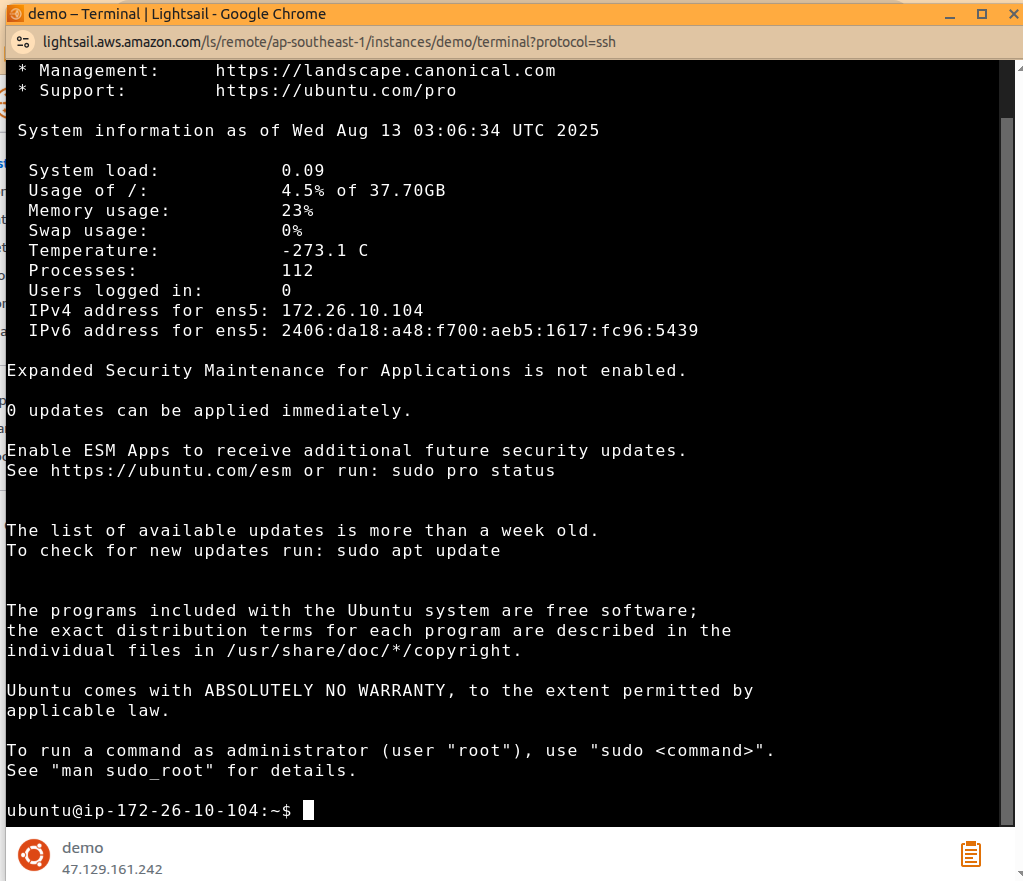
- SSH via web is not a good idea. We will use the terminal of your local machine to manage our VM.
- By default, AWS Lightsail uses public and private keys to connect to the instance (private key is on your local machine and public key is on the instance). But we can change it to use password authentication, which is easier for SSH but less secure.
3. Some Basic Linux Commands
- If you’re not familiar with Linux commands or you’re a Windows user, go to ChatGPT and ask it to help you. But here are some basic commands that you should know:
ls- list all files and directories in the current directorycd- change directorypwd- print the current working directorymkdir- create a new directoryrm- remove a file or directorycp- copy a file or directorysudo- run a command with root privileges (Shut the f*ckUp andDOthe command — just kidding)vim- edit a file. When in vim editor, typeescto change between command mode and insert mode. Some commands::w- save the file:q- quit the editor:wq- save and quit the editor:q!- quit the editor without saving:wq!- save and quit the editor (force)i- enter insert mode
No more double-click, right-click, open file explorer, open terminal, open browser, open everything. Just you and the keyboard working on a white-on-black terminal. Feel like a hacker! 😄
4. Configure SSH via Password
- To do this, we need to update the SSH config file of the VM instance.
- Still at the web terminal, type
sudo vim /etc/ssh/sshd_configto edit the SSH config file. If vim is not installed, typesudo apt install vimto install it. Or you can use nano (which is default installed in Ubuntu and easier than vim). - In this file, you can see the config for SSH in key-value pair syntax.
- Find the line
PasswordAuthenticationand change it toyes - Find the line
PermitRootLoginand change it toyes - Then type
:wqto save and quit the editor. - After that, you need to remove the default SSH config of AWS which turns off password authentication. You can see it via
sudo cat /etc/ssh/sshd_config.d/60-cloudimg-settings.conf- it showsPasswordAuthentication no, so remove it or else you can’t SSH via password:sudo rm /etc/ssh/sshd_config.d/60-cloudimg-settings.conf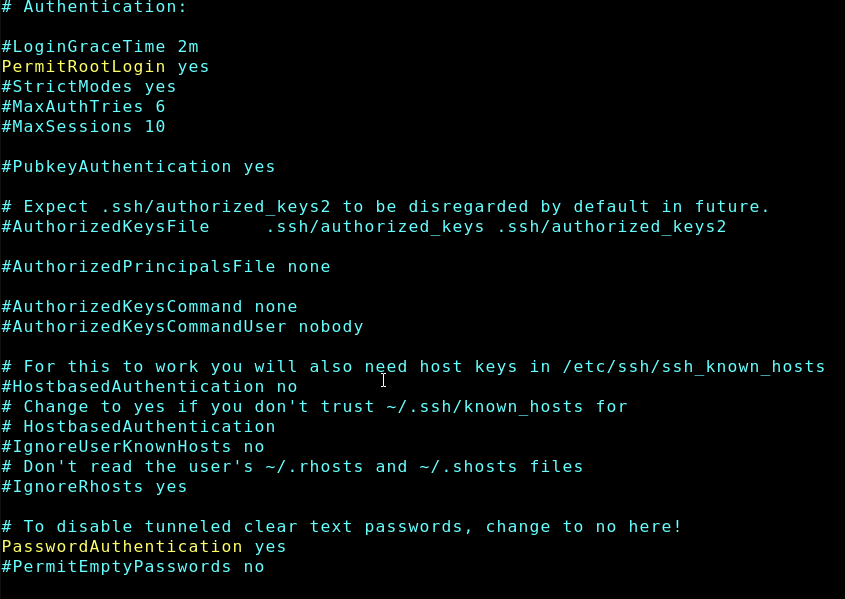
- Then type
sudo service ssh restartto restart the SSH service. - Then type
sudo service ssh statusto check the SSH service status. - Also, change your root password by typing
sudo passwdand typing your new root password twice. - Now open your terminal or cmd if you’re a Windows user and type
ssh root@your-instance-ipto connect to the instance. Your instance IP you can see in the AWS Lightsail console. Using your computer terminal makes it easier to type commands, copy-paste, and it’s faster than the web terminal too.
5. Install Environments
- To run services, you need to install all environments for that service: Language (Node.js, Java, etc.), Database (MySQL, MongoDB, etc.), Framework (Express, Spring, etc.), etc.
- In Linux, installing something is simple - just type
sudo apt install <package-name> - To install Node.js, you can install it via nvm (Node Version Manager):
# Download and install nvm:
curl -o- https://raw.githubusercontent.com/nvm-sh/nvm/v0.40.3/install.sh | bash

# In lieu of restarting the shell
\. "$HOME/.nvm/nvm.sh"

# Download and install Node.js:
nvm install 22

# Verify the Node.js version:
node -v # Should print "v22.18.0"
nvm current # Should print "v22.18.0"

# Verify npm version:
npm -v # Should print "10.9.3"- For databases and other things, you can see my gist here: https://gist.github.com/lilhuy0405. Just copy and paste the command to your terminal and follow the instructions.
- Then clone your repo to the instance. Try to run it and access it via browser:
http://your-instance-ip:your-port - Tada! Now you have your web app running on your instance. You can share it with others - goodbye localhost!
6. Run Your App in Background
- Now your web app is running on your current SSH session in your terminal. What happens if you close your terminal? Your app will stop because this SSH session is closed. Even though your VM is running 24/7, your app is not. To run your app as a service, you need to run it as a background process.
- There are some ways to do this. One difficult way is to move your web app to a
systemdservice. But there’s another easy way - usepm2, a Node.js package that helps you run your app as a service. Install pm2 by typingsudo npm install -g pm2. Then run your app with pm2 by typingpm2 start app.js. Or you can create a bash script to run your app:vim your-app.shand add the command to run your app, e.g.,npm start. Then make it executable by typingsudo chmod +x your-app.sh. Run your app in background by typingpm2 start your-app.sh - Then check the status of your app by typing
pm2 status - Then restart your app by typing
pm2 restart your-app-name-or-id - Then stop your app by typing
pm2 stop your-app-name-or-id - Then delete your app by typing
pm2 delete your-app-name-or-id - Now your app is running as a service and you can access it via browser:
http://your-instance-ip:your-port, even when your SSH session is closed. - Bonus: Another easy way without installing anything is to use
screen. Screen creates a terminal session that you can detach and reattach later. Typescreento create a new screen session. Then typenpm startto run your app. Then typeCtrl + A + Dto detach the screen session. Then typescreen -rto reattach the screen session.
7. Domain and SSL Certificate
- You can now give your frontend team this URL:
http://your-instance-ip:your-port, but only for testing. Because it’s HTTP, not secure (not HTTPS), and frontend when deployed usually uses HTTPS. Browsers will block any HTTP request when trying to access a page with HTTPS. - So to get HTTPS, you need to get an SSL certificate. You can install a free SSL certificate via
certbot(this is an Ubuntu package), but it’s complicated for beginners. So you can useCloudflareto get a free SSL certificate. Register your Cloudflare account. In the Dashboard, you can purchase a domain or if you already have a domain, you can add it to your Cloudflare account. - After you add your domain to Cloudflare, you can see the DNS records of your domain. Point the A record of your domain to your instance IP. Now open your browser and type
https://your-domain- you will see your web app is running with HTTPS. The traffic will look like this: user → your domain → Cloudflare (add SSL) → your instance - Yes, but your app runs at a port like 3000 or 8080, and domains don’t support ports. By default, A records point to port 80 (HTTP port). You can update your code to run at port 80, but it’s not good. Or if you have multiple services on your instance, you can’t let all of them run at port 80.
- This is when nginx comes to the rescue. Nginx is a web server that can proxy requests to your app.
8. Nginx as a Reverse Proxy
- Your services are servers, but nginx is a server too, which runs before your services at port 80. But it can do a magic thing: ‘reverse proxy’. The flow will look like this: 2 domains point to 1 instance IP, but nginx will proxy the request to the correct service. E.g.,
backend.your-domain→ nginx →backend.your-instance-ip:3000andfrontend.your-domain→ nginx →frontend.your-instance-ip:8000 - Another benefit of nginx is you can use it as a load balancer to distribute traffic to your services. The Node.js default server is pretty bad - it can go down anytime. We need nginx to help Node.js be a good server.
- Install nginx by typing
sudo apt install nginx - Then edit the nginx config file by typing
sudo vim /etc/nginx/sites-enabled/your-domain - Then paste this code to the file:
server {
    listen 80;
    server_name your-domain;
    location / {
        proxy_pass http://localhost:3000; # your service port
    }
}- Test your nginx config by typing
sudo nginx -t - Restart nginx by typing
sudo systemctl restart nginx - Now open your browser and type
http://your-domain- you will see your web app is running with nginx. - If you have another service exposed via another domain, you can add another file or add a server block to the same file. Then restart/reload nginx by typing
sudo systemctl restart nginx - Nice, right? Now your services are running with HTTPS. One of the amazing things when we use Cloudflare SSL proxy is that your real IP of the VM is hidden because traffic will go through Cloudflare proxy. When people check the IP of your domain, they will see Cloudflare IP, not your VM IP - very secure, right?
Ok, that’s it for this long chapter. That’s how I deployed a lot of backend services before for my company when my boss had a lot of AWS credits! 😄 Again, all these things are not hard or best practices, but maybe the easiest way for a noob guy like me. And as I said, now you can do these things with one prompt like: “I have an AWS Lightsail instance, I want to deploy my web app to it” and ChatGPT will help you do it! 😄
Thanks for reading. See you in the next chapter!
📚 Series Navigation
| Previous Chapter | Series Info | Next Chapter |
|---|---|---|
| ← Previous Chapter 📚 Some concepts and terminologies | DevOps Series Chapter 2 of 16 | Next Chapter → 🐳 Docker and the world of containerization |